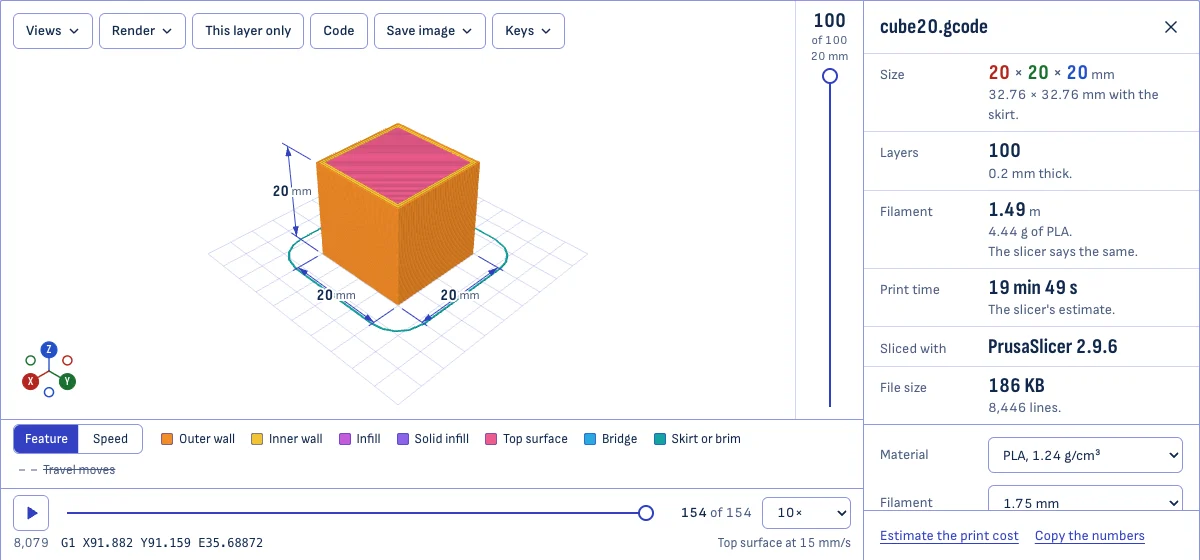
What G-code is
G-code is the list of moves a machine is told to make, one to a line. A slicer writes it from a 3D model for a printer; a CAM program writes it for a mill, a router or a laser.
A line such as G1 X50 Y20 E1.2 F1800 reads: move in a straight line to X 50, Y 20, push 1.2 mm of filament through the nozzle on the way, at 1,800 mm a minute. G0 and G1 are straight moves, G2 and G3 are arcs, and commands starting with M switch things on and off: heaters, fans, a spindle. Anything after a semicolon is a comment for people. Slicers use comments to mark where each layer starts, what is being printed and what they estimate the print will take.
The file is the whole print. A printer does what the lines say and nothing else, which is why looking at them before you start is worth a minute.
What to check before you print
- The size. The size shown is that of the part itself, measured from the paths with the width of the plastic included. If a part that should be 60 mm long reads 6 or 1,524, the model was scaled or its unit was misread before slicing.
- The first layer. Drag the layer slider to the bottom. The first layer should be a complete outline, filled, with nothing missing where the part touches the bed.
- The inside. Step up through the layers to see the infill, and whether thin walls and small holes came out as you meant. Choose “This layer only” to look at one layer on its own.
- Overhangs, bridges and supports. Where the slicer marks them, bridges and overhanging walls have colors of their own. Supports show where the slicer put them, and where it did not.
- Speed. Color the paths by speed to see where the printer slows down, which is often where quality matters most.
- Travel. Switch on travel moves to see how the nozzle gets from one place to the next, and how often it crosses open air on the way.
- Filament and time. Both are in the panel beside the view, with the weight for the material you choose.
Stepping through a print
The slider up the side of the view chooses the layer. Everything below it stays in place, so the print is shown as it will stand when that layer is done. The slider under the view moves through the layer on top, one move at a time.
Play runs the print forward from wherever it stands, at 1, 10, 100 or 1,000 times the speed of the real thing. The nozzle moves at the speeds in the file, so slow outer walls and quick infill look as they will on the printer.
Under the view is the line of the file being made. Choose Code to see the lines around it: the list follows the nozzle, a click on a line shows the print as it stands once that line has run, and the arrow keys walk the file a line at a time. A click on any path in the view finds the line that made it.
How the numbers are worked out
Filament is what the file pushes through the nozzle: the E values of every move, with retractions and the plastic pushed back out after them counted once. Weight is that length times the cross-section of the filament times the density of the material:
| Filament | Density | Weight of one meter |
|---|---|---|
| PLA, 1.75 mm | 1.24 g/cm³ | 2.98 g |
| PETG, 1.75 mm | 1.27 g/cm³ | 3.05 g |
| ABS, 1.75 mm | 1.04 g/cm³ | 2.50 g |
| PLA, 2.85 mm | 1.24 g/cm³ | 7.91 g |
When the file names its material, its density and the width of its filament, those are used. When it does not, as with files from Cura, you choose the material, and the width is told from how much filament each line takes.
Layers are counted from the marks the slicer leaves at every layer change. A file with no such marks is cut into layers by the heights it prints at.
Print time is the slicer’s own estimate when the file carries one. Otherwise it is the length of every move divided by its speed, a figure the real print can only exceed.
Size is the box around the walls, infill and surfaces of the part. Skirts, brims, supports and prime towers are left out of it, and when they make the print take up more room on the bed, the larger size is given as well.
Files from each slicer
| Slicer | Files | Read from the file |
|---|---|---|
| PrusaSlicer | .gcode, .bgcode | Layers, features, bead widths, time, filament, material, colors |
| Bambu Studio | .gcode.3mf, .gcode | Plates, layers, features, bead widths, time, filament, material, colors |
| OrcaSlicer | .gcode, .gcode.3mf | Plates, layers, features, bead widths, time, filament, material, colors |
| Cura | .gcode | Layers, features, time, filament. Bead widths are worked out from the filament each line takes |
| SuperSlicer, Simplify3D, ideaMaker and others | .gcode | Layers and features where the file marks them. Any G-code is drawn, whoever wrote it |
Binary G-code is the packed form that PrusaSlicer writes for the Prusa MK4, MINI, XL and CORE One. It holds the same lines in about a sixth of the space, and opens here like any other file.
Arcs written by Arc Welder or by a slicer’s own arc fitting (G2 and G3) are drawn as arcs, to within a hundredth of a millimeter.
CNC programs
A program for a mill, a router or a laser opens in the same view. Cuts are solid lines and rapid moves are dashed. Cuts are colored by depth, from the deepest to the shallowest, or by feed rate.
- Size and depth. The width and length of everything cut, and the lowest and highest point the tool reaches while cutting.
- Passes. Each stretch of cutting at one depth is a pass. The slider up the side steps through them in the order the machine makes them.
- Time. Cutting moves at their feed rates, plus rapid moves at 5 meters a minute. Tool changes and the spindle coming up to speed are on top of that.
- Units. A program in inches is shown in inches, with millimeters beside the size.
Straight moves, arcs in any of the three planes, drilling cycles (G81 to G83 and their kin), absolute and relative positions and moved origins (G92) are followed. A laser’s moves at zero power are drawn as travel. Variables, subprograms and rotary axes are not followed; when a program uses them the page counts the lines and says so, so you know the picture is incomplete.
What is not shown
- What the firmware adds. A macro such as
PRINT_STARTruns on the printer, and the file does not say what it does. Homing, bed leveling and heating take time that is not in the picture. - Speeding up and slowing down. The paths are exact; the timing of the playback is that of the speeds asked for, without the slowing at corners.
- Plastic. The beads are drawn with the width and height the slicer gives them. How the real plastic sags, strings or bridges is for the printer to show.
Questions
Is my file uploaded?
No. The file is read and drawn by your own browser. Nothing is sent to a server, so a design you are not free to share stays on your device. To see for yourself, open the sample, switch off your connection, then open your own file: it opens all the same.
Which files can I open?
G-code as text (.gcode, .gco, .g), binary G-code from PrusaSlicer (.bgcode), sliced 3MF files from Bambu Studio and OrcaSlicer (.gcode.3mf), and CNC programs (.nc, .ngc, .tap, .cnc). A file with another name opens too if its lines read as G-code.
Why is the filament figure a little higher than my slicer's?
Because of priming. Before the first layer most printers push some filament out to fill the nozzle: a line along the edge of the bed, or a purge on the spot. Slicers leave some or all of that out of their figure. This page counts everything the file pushes through the nozzle, says how much of it is priming, and tells you what the slicer counted. The difference is a fixed amount, usually 20 to 150 mm, so it only shows on small prints.
Why did my print take longer than the time shown?
When the slicer wrote its own estimate into the file, that estimate is shown: it allows for the printer speeding up and slowing down, and is the best figure the file holds. When it did not, the time is worked out from the length of every move and the speed asked for it, and is shown as "at least": a printer needs time to speed up and slow down at every corner, to heat up and to change filament, and none of that is in the file.
Can I open a Bambu Lab .gcode.3mf file?
Yes. A sliced 3MF holds one G-code file for each plate. Drop it here and choose the plate; each is listed with the print time the slicer recorded. A 3MF project that has not been sliced has no G-code in it yet, so it opens in the 3MF to STL converter instead, where you can see the model.
How large a file can I open?
In testing, a 200 MB file of 7.3 million lines opened in about two seconds on a laptop and turned smoothly afterwards. The file is read in pieces in the background, so the page stays usable and you can cancel. Prints of more than 600,000 moves are drawn as thin lines when shown whole, and as full beads of plastic one layer at a time.
Does it show CNC and laser G-code?
Yes. A file that never extrudes is read as a CNC program: cutting moves and rapid moves are drawn differently, cuts are colored by depth or by feed rate, and the size, the cutting length and a machining time are shown. Programs in inches (G20) are shown in inches with millimeters beside them. Arcs, drilling cycles and laser moves at zero power are understood. Variables and subprograms are not followed, and the page says so when a program uses them.
Can I edit the G-code or send it to my printer?
No. This is a viewer: it changes nothing in your file and talks to no printer. To change how a model prints, change the settings in your slicer and slice again.